Home Tags Posts tagged with "reconstruction"

reconstruction

Long winter and loads of snow take their toll now in the form of wet walls and foundations. How can you effectively prevent it from happening?

The moisture is a problem in almost every house. In the 1st as well as in the 5th floor, you can find “maps”, condensed salts or mould. These are reliable evidence of damp walls with disrupted both the plaster and the masonry itself. Additionally, heat losses occur as the thermal insulation is impaired and in some cases, an unpleasant odour can join.

crop-587966-shutterstock-160572620

Causes Of Moisture

Therefore, before you start the fight against the moisture, you have to find out the cause, type and source of moisture, as well as the level of damage and possible salinity. Does water rise from the ground? Does vapour condense in the house? Does water leak from the roof or from a broken pipe? If you are unsure, do not hesitate to hire a professional building remediation company who can perform not only the drying, but also a comprehensive analysis of the causes of moisture.


Remediation Of Wet Walls

The remediation of masonry, performed at the base of walls, at foundations and at pavements, can have several forms. The incorporated insulation is suitable in buildings, where moisture rises from the basements. Undercutting of walls and inserting of waterproofing is quite a common solution, but tight closing of the gap by strength wedges is necessary. Other methods include electroosmosis or magnetokinetic wall drying and chemical injections.

stavba-bydleni-dum-prestavba-rekonstrukce-01_300x225

Regular Checks To Avoid Moisture

Often ventilate the rooms to prevent vapour from condensation and mould from formation. Install dehumidifiers and fans in bathrooms and kitchens. When building a house, use such isolation that can drain the moisture out of the house. After every winter and in autumn, check the conditions of the roof, gutters, plaster and masonry. Any cracks may later become a bigger problem and a source of moisture leakage.

Hints And Tips

It is not easy to arrange a bathroom in an apartment or in a house, so that it met the practical requirements and it also fitted into the given space.

If you have a chance to influence the layout of the components in your bathroom, think twice before you decide where you place each component and how much space you will get around it. A washing machine, a sink and a bathtub require enough space around them. Sufficient space will make easier both your personal hygiene and any later works that will be done in the bathroom.

Manufacturers of bathroom accessories states different dimensions. Unfortunately, many bathrooms in blocks of flats do not even approach these values.

You need at least 75 cm from the edge of the object into free space in front of a bath, a sink and a toilet. The reason is you need to be able to bend, turn around and get up comfortably. At the same time, the distance between the sanitary items should not be less than 25 cm.

“It is 60 cm between the centres of a toilet and a bidet. The same applies to the distance between a toilet and a urinal. The distance between the centre of a toilet, a bidet or a urinal and other stationary object (a corner, a wall) should be 40 cm at least. Ideally, it should be 80 cm around a toilet”, an expert says.

There should be a gap of at least 25 cm between a sink and a side wall. A sink needs to be 65 cm wide, so that you could wash conveniently. A shower enclosure should be at least 90 cm wide. The handling area in front of a washing machine should not be less than 90 cm, especially if you plan a front-loading washing machine (then it is a real necessity).

1735292

The depth of the space, in which a toilet is located, should be 120-135 cm at least. However, in many reconstructed block of flats, it is only 80-98 cm. The height of the toilet does not usually cause any difficulties. A toilet seat should be able move as needed, between 40 and 50 cm.

Anyway, when planning a bathroom, consider the body proportions of all the people who are going to use the bathroom. If you do not have enough space for both a bath and a shower, you can prefer a more spacious, at least 90 cm wide, enclosure with disabled access. Not only it looks better, but its recessed tray or a suitable floor surface is more enjoyable both for stepping in and out of the shower.

And if you cannot imagine a bathroom without a bath, choose one that is not only beautiful but comfortable and safe, as well.

Sometimes It Is Necessary

The dirt, noise and dust are among the most common concerns of homeowners before a reconstruction of the windows and the window sills. You should always consider well, whether they are worth to repair or whether the window frames and sills should be replaced instead.

However, when you do not have plenty of cash, you have to opt for a reconstruction. It will save some of the heat leaks at least. And you need not to worry about the piles of junk.

9297732849_2086e7cc76_h

The Correct Procedure

Likewise before the classic window replacement, it is necessary to free as much space around the windows as possible, so that you (or the contract workers) could handle the window panes safely. Get all the tools and utensils ready: the sealants, the spare parts of the frames, the spatulas and the silicones.

If you want to eliminate the amount of the dust and clutter, use a large foil to cover the furniture. The repair of the windows in an apartment does not usually take more than a few days. If you hire a company, the work will be done much faster. Anyway, you should wait for a warm and dry weather, so that the rain did not get into your apartment during the reconstruction.

stare_okno_A_-1x600_1206120842stare_okno_A2_-1x600_1206120843

The Window Frames

After you take them out, the old frames of the window panes must be burned with a heat gun to remove the old paint first. The parts of the frames damaged by weather and time should be completely replaced. Put the window panes back into the repaired frames and fill all joints with a quality sealant. The whole window frames should be cleared from the old paint as they need to be repaired, too.

Experts recommend replacing the outer side of the frame with new parts, so that the window could fulfil its purpose for further years and could withstand the rain, humidity, snow, frost and wind. The paint (the finish) must be applied several times and it is important not to save on quality paint. It prevents the damage of the wood when the weather fluctuates and it gives a new and modern look to the window.

During a reconstruction of the windows in a block of flats, it is good to replace the outer window sills completely. As they are usually several decades old, the rain water certainly leaks beneath them or maybe a wasp nest has created there. This work must be done carefully, as you work over an open space. There is a danger not only of your fall, but also a fall of the tools, the window sill or a piece of the plaster down to the sidewalk, where it can cause an injury. That is why it is necessary to secure the space beneath the windows so that there were as few people moving as possible.

Place the new window sill on a well repaired and patched area. You do not need to make a new plaster, use just a little sealant to prevent the water leakage under the window sill and into the dwelling.

During the reconstruction of the windows, it is also advisable to check the functionality of the blinds and have them repaired possibly, as it does not make sense to have a repaired window with faulty blinds. You can use various foams instead of the sealants. Do not forget that even a repaired and sealed window frame needs to “breathe”. Otherwise you would risk the creation of mould in the humid parts of the apartment.

Are you planning a floor reconstruction? You can think about the ceramic material Liapor.

If you plan to reconstruct a floor in an apartment, a family house or a cottage, you can try the dry method. Instead of the classic method of pouring concrete or a cement plaster onto the subfloor, you use the lightweight ceramic substrate Liapor (keramzit) to level the floor. It is a purely natural ceramic material and by using it, you avoid the undesirable cracks and the floor will be perfectly level. A significant bonus is the excellent thermal and acoustic insulation of the floor.

The floor reconstruction with Liapor can be done on any surface including concrete or wood.


The Main Advantages Of Floor Levelling With Liapor

The biggest advantage of the floors with the Liapor sub-base is the simple and quick installation in the dry way. The time of the implementation is reduces dramatically (no necessary breaks), and in addition to it, this type of flooring is versatile, so it can be used in a block of apartments, in a new building as well as during a renovation of an older house. Due to the low weight of the dry compound, it does not burden the supporting structure excessively, that is why using of Liapor is suitable e.g. for the flooring solution in roof extensions. The Liapor layer also enables a secure placement of heating and electrical wiring. The top layer can made of essentially any material: wood, laminate, PVC (vinyl), marmoleum, tiles, carpet etc.

01-Stará-očištěná-podlaha-335x255

Instructions For The Floor Reconstruction Using Liapor

  • First of all, it is necessary to remove the old flooring including the underlay and to clean the subfloor thoroughly.
  • Next, put down the separating layer (e.g. a nonwoven geotextile).
  • Lay the levelling sub-base made of Liapor, the recommended fraction is 1-4 mm; it is suitable to apply when the substrate is uneven more than 20 mm; the height of the layer is not limited.
  • The Liapor is spread and pressed only manually usually wooden slats and a trowel.

You cannot walk on the fresh Liapor layer directly, but you can cover it temporarily with wood or Styrofoam plates in the places of movement and manipulation.

  • When the Liapor layer is compacted, you can lay the floor boards (all types available) on it:

To ensure the proper function of a floating floor, you have to separate the floating boards from the walls and from other building structures using the peripheral expansion strips;

You install the floor boards on a prepared layer made of levelled Liapor sub-base, using the tongue and groove system. If you install a multilayered system, you have to keep the staggering of joints in every layer;

When the floor area is large, it is suitable to lay the Liapor sub-base and the floorboards gradually. Ideally, prepare a sub-base area, which is 30% larger than the surface covered by the floorboards, every time. The installation usually begins in the corner opposite to the entrance door;

You can achieve the perfect alignment of boards, their rigidity and flatness of the floor by applying glue into the joints between the boards and by the subsequent fastening with the screws (according to the manufacturer’s recommendations).

  • Finally, fill the joints with the putty. The floor is finished now and any final top layer (laminate, tiles, carpet) can be installed on the prepared substrate.

05-Zpracování-podsypu-z-Liaporu-500x333

How And Where You Can Buy The Ceramic Aggregate Liapor?

The ceramic aggregate Liapor can be purchased online or in the shops of Liapor sales network.

There are a lot of things you should know before you choose and install a floor covering. We are going to summarize the information about floors made of stone or wood planks, now.

There is a different type of flooring for every room in the house or in its immediate vicinity. Every floor covering has its advantages and pitfalls and you should know them before you buy the material. We are going to focus on stone and wood, now.

Stone is one of the oldest building materials: it is strong, it can withstand the wear and tear of time and, moreover, it is beautiful to look at and to touch. You can use the individual tiles or pavers, either rough (preferably the granite ones) for a patio or a garage, or finely machined and polished (these are used to create fascinating marble pattern in entrance halls.). If the stone is coarser, you have to accept the fact that you will be able to clean all the joints only on your knees with a scrubber and a lot of water – and the dirt will be back in a few days again.

img_5183

The Materials For A Stone Floor

In addition to hard granite and decorative marble, sandstone is often used nowadays, because of its pleasant, warm colour (but with the disadvantage of lower abrasion resistance), as well as slate, which splits into slices easily. Try the basalt paving, which is proven in factories, on places, where a really high load is expected.


Installing A Stone Floor

You do not need to build any special anchoring for a stone floor, and if it is a paving the base needs to be aligned and even. The stone is very heavy and it will not be easy to lay it in upper floors without a massive static protection.

The stone also maintains heat for a long time, therefore it takes time to get warm, however it can retain the heat longer, too. The walls around the stone also hold moisture more, that is why you should plan the insulation and the painting well. The stone is outstanding as it is, so it would be a shame to cover its characteristic pattern with paint. And whereas it can withstand heavy load, it does not need any protective coating or finish.

kamenna-podlaha-3

Wooden Parquets, Boards And Joists

The forms of wooden floors are countless, as well as are the types of wood. The oak floor last the longest and it can also be used in wet areas, such as a bathroom, because oak hardens by the influence of water and becomes almost as hard as rock. And thanks to the technology of drying and laying of wood, the problems with large gaps, creaking and warping have almost disappeared. Unlike the stone, however, is necessary to treat the wood with a finish or oil base which prevents the penetration of dirt.

Wood can also be renovated several times by sanding and refinishing it, or by replacing of the individual damaged parts. Thanks to the various patterns, knots and shades, it is natural that every piece is different. A mosaic floor compiled from various types of wood looks interesting. However, you must pay attention to the different responses to heat and humidity. For the wood, likewise for a human, the temperature of 20 ° C at 60% humidity is ideal. Anyway, significant fluctuations from this optimum do not damage the wood.

palubky

Installing A Wooden Floor

There are two different ways to install a wooden floor. The floor boards or planks are laid on a grid made up of joists of approx 12 × 7 cm at intervals of about 0.5-0.7 m, between which insulation should be inserted. Because of the grids, the floor will be increased above the current level. It can be somewhat impractical in attic spaces, where every inch is needed. Contrariwise, the parquets are glued on a perfectly level surface.

The carpenters sort the wood not only by its quality and hardness, but also by the uniformity of the pattern (which has nothing to do with the quality of the wood itself). It can help you to choose a uniform floor or a surface with a distinctive pattern.

The old formica bathroom may not be the worst thing you have to solve during the reconstruction. In this case, a young couple (with the help of a construction company) had to deal with a bathroom in an old brick building.

The original owners were an elderly couple who hardly ever invested in the interior for the whole decades, they had been living here. That is why most of the fixtures were the original ones, including the bathtub, the sink, the gas heater and the tiles.

So the young couple had a simple decision: a complete reconstruction was necessary. Although the original idea of enlarging the space failed, they managed to customize the space so that a shower could be installed.

The next major change meant moving the gas heater, which also supplies the kitchen with hot water, from the bathroom on the toilet. Although the house has a central heating, the original project solved the water heating by a separate gas heater. This solution is, however, present in many apartments in old houses in the CR till today.

There was not enough space for a sufficiently large water boiler so a modern type of gas heater was chosen, which needed, however, a flue exhaust chimney leading up to the roof (the apartment was fortunately on the top floor of the house).

The modern gas heater does not depend on the supply of combustion air from the inner space of the house, so it was not a problem to place it into the small space of the toilet. However, this solution meant a higher purchase price of the appliance and an installation of a new flue.

REZ5868cc_20141205_003

Solving The Small Space

The third small space obtained by moving a partition wall, which was closed by a door, was equipped with a washing machine and a tumble dryer. This utility room would serve as storage for buckets, vacuum cleaners and other cleaning equipment.

However, the couple really wanted a shower, because they do a lot of sports, as well as a bathtub for their future kids. That is the why they finally decided to extend the bathroom with a shower enclosure. The shower was closed in a niche 120 cm wide by a glass door without a frame, so it looks quite inconspicuous.

The architect modified the project then: the washing machine was moved to the kitchen and the tumble dryer to the closet in the hallway, which was fixed with good ventilation and an electric outlet.

“Unfortunately, compromises cannot be avoided completely during a reconstruction”, an architect says.

REZ5868d2_20141205_006

The Safety And The Comfort

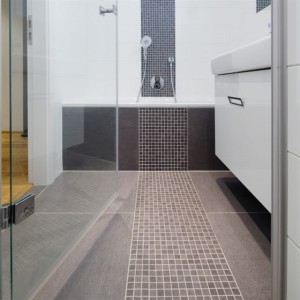
Even so, the space of the new bathroom and the toilet was quite small. To enlarge it visually, the owners chose glossy white wall tiles, dark anthracite floor tiles complemented by mosaic areas. The white tiles enlarge the space visually and they are a timeless solution, which can easily be completed with colours using towels and other accessories. The interesting mix of mosaics and large pavers proved to be better than the originally planned simple mosaic.

The modern gas heater is only 25 cm deep and it is covered by a made-to-measure door, it is located inside the toilet room. Both the door and the hanging cabinets connected to the sink have a glossy finish.

The owners chose a high type of the doors (210 cm) in the whole apartment, which help to enlarge the space visually. The doors have a special “climate” finish, which protects them from the moisture. The edges of the door in the bathroom are covered by aluminium rails which looks luxurious, when the door is opened. A mechanical damage of the edges is nearly impossible.

For a greater comfort, both a hand shower and a head shower were installed.  In a brick house like this, the owners could afford a gutter instead of a shower tray. It was possible to place the sewer branch so that the outflow was lower, which is rarely possible in the prefabricated houses.

There is neither a heating ladder, nor the original radiator in the bathroom as the owners preferred a floor heating.

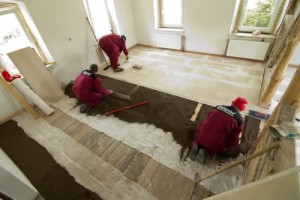
The reconstruction of the bathrooms was part of the overall reconstruction. In a case like this, you have to take the new wiring and tile installation in account, which requires some time as good work cannot be done in haste.